A Guide to Security and Privacy for Windows XP Home Edition
Setting up Usernames During Install
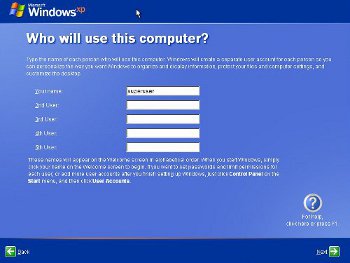
Once the username is set up, Windows is almost up and running.
Securing Windows - Configuration
So. You've got a clean copy of Windows, and lots of security patches, and you're probably behind a router. What now?Once you've got Windows installed and running (but still NOT connected to the internet), you should now install all the service packs and security updates you have, rebooting where needed.
Once you've finished installing all the updates, it's time to properly secure Windows before connecting to the internet.
Securing Windows - Disabling Services
In Windows terminology, Services (often called 'Daemons' in Linux) are programs that run quietly in the background performing various tasks that you may not be aware of. Many of these services perform network-related tasks, and each network service is a potential point of entry for an attacker. A number of Windows services have been compromised in the past. It makes sense to switch off any services that aren't needed.Firstly, open the control panel, go to administrative tools (via the Performance and Maintenance category if category view is enabled, which I advise disabling by selecting 'Classic View' from the menu on the left), open up 'services', and then set the following services to 'Disabled' (double-click a service to quickly access its properties):
Application Layer gateway
DHCP Client - Don't disable if you haven't set your IP address manually
Extensible Authentication Protocol Service
Fast User Switching Compatibility
IPSEC Services
Messenger
Net Logon
Net.Tcp Port Sharing Service
Netmeeting Remote Desktop Sharing
Network DDE
Network DDE DSDM
QoS RSVP
Remote Access Auto Connection Manager
Remote Access Connection Manager
Remote Desktop Help Session Manager
Server - Don't disable if you're using your PC as a fileserver, but I advise against it, and I strongly advise against it if you're running Windows XP Home, rather than Windows XP Professional - try googling 'windows XP Home simple file sharing' for more info.
SSDP Discovery Service - involved in UpnP network communication - not to be confused with hardware plug'n'play
TCP/IP NetBIOS Helper - you may need to leave this alone if you access a fileserver over a local network, however I have found that connecting to a Linux Samba server via a fixed IP address in the form \\xxx.xxx.xxx.xxx\sharename works fine without this enabled.
Terminal Services
Webclient
Wired Autoconfig
Wireless Zero Configuration - unless you're using your PC to connect to the internet via a wireless network. The whole idea of wireless networks is a bit off-putting from a security point of view. It feels a bit like hanging a router out the window and allowing anyone to connect an Ethernet cable to the network.
Windows Firewall/Internet Connection Sharing(ICS) - DON'T disable this if you intend to use the Windows firewall rather than a third-party firewall.
In some circumstances disabling these services may stop something working that you actually use in your setup. Proceed with caution. Research the purpose of these services if in doubt. Some of these services may not appear on a fresh install. After completing the install and adding all the drivers and desired software, return to the services list and check for any new services.
Securing Windows - Misc. Configuration
Next, right-click on My Computer and select properties.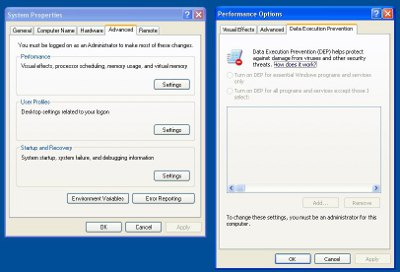
Under the 'Advanced' tab, press the Settings button under 'Performance', and then select the Data Execution Prevention tab (if it's available). Choose "Turn on DEP for all programs except those I select:" If, after enabling this option, you find a program crashes that used to work okay, try adding it to the list of exceptions and see if that fixes it (If you run the offending program as a user with admin power, Windows will automatically give you the option to add it to the exception list. Once done, run the program again as a normal user).
Disabling Autorun
Autorun is the Windows feature that pops up a menu asking what you'd like to do with a newly loaded CD or inserted memory stick. If there's an autorun.inf file on the device, it won't ask for further instructions and instead will follow the instructions in that file. Malware can use this behaviour to spread itself via USB memory sticks and other removable devices and media, so it's a good idea to switch it off. Unfortunately, switching it off in Windows XP Home is more difficult than it really needs to be. See this Microsoft article for details of how to disable it other versions of Windows.There are three different approaches to this, each with advantages and disadvantages.
Method 1 - Easy
Hold down the shift key when inserting USB sticks and loading CDs (don't release the shift key until Windows has completely finished reading and initialising the device, which can take quite a few seconds).This is by far the easiest method as it doesn't involve editing the registry, but it's also the least secure, as it depends on the user getting it right every time.
Method 2 - Tricky
Using the Registry Editor (Start... Run... 'regedit') browse to the following registry key: Note - be very careful when editing the registry!HKEY_CURRENT_USER\Software\Microsoft\Windows\CurrentVersion\policies\Explorer\
and edit the NoDriveTypeAutoRun value.
Change the value to '4' if you wish to disable autorun on removable devices such as USB memory sticks, or change it to 'FF' if you wish to disable autorun on all devices. Note that if you disable it for all devices, install CDs will no longer automatically run their installer programs when loaded and you will have to open the CD manually and run the installer (or simply right-click the CD/DVD icon and choose 'autoplay').
To make life easier here's a registry file that will make the necessary changes without having to mess around in regedit - only tested on Windows XP Home and use at your own risk. Download and double-click to use (but as a security-conscious user, you will of course inspect the file with Notepad before installing it...).
Disable autorun on all devices for the current user account
Disable autorun on removable devices only for the current user account
The disadvantage of this method compared to method 3 is that you will need to repeat this every time you add a new user. Later in this guide I strongly recommend you create a new limited user account for everyday use. If you use this method of disabling autoplay, you will need to temporarily give the new account superuser powers and then edit the registry, and then return the account to a normal limited user account level.
Method 3 - Even trickier
This works in much the same way as method 2, except here we modify the following registry key:HKEY_LOCAL_MACHINE\Software\Microsoft\Windows\CurrentVersion\Policies\Explorer\
and change the NoDriveTypeAutoRun value as before.
Only problem is, Win XP Home doesn't seem to create an Explorer\NoDriveTypeAutoRun key/value by default, so you'll have to make one. This involves browsing to the Policies key, then right-clicking it in the left-hand window pane, choosing New, then Key, then typing in 'Explorer'. Next, ensure the newly-created Explorer key is selected in the left pane and right-click on the right pane and select New... DWORD value. Name the value NoDriveTypeAutoRun and press return. Double-click it to edit, and type in 04 or FF depending on whether you want to disable autorun on USB sticks or everything.
The finished key should look like this:
NoDriveTypeAutoRun REG_DWORD 0x000000ff (255)To make life easier here's a registry file that will make the necessary changes without having to mess around in regedit - only tested on Windows XP Home and use at your own risk. Download and double-click to use (but as a security-conscious user, you will of course inspect the file with Notepad before installing it...).
Disable autorun on all devices system-wide
Disable autorun on removable devices only, system-wide
This is the most secure method, and it will apply to all users on the machine. The downside is, obviously, that it's the most difficult to apply and also that it appears to disable the 'Autoplay' option in the right-click context menu for removable devices for any user accounts that are created after this point. User accounts created before this point will keep their autoplay option.
Disabling unneeded network protocols
Open up the Control Panel, and then the network connections.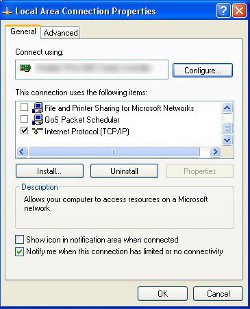
Next, highlight "Internet Protocol (TCP/IP)" - don't untick it - you need this switched on - and choose properties.
This is where you can manually or automatically set the IP address of your computer, and tell it where to find your internet gateway (router, or cable modem if you don't have a router). Set the various IP addresses as detailed earlier (if it wasn't already set up during install), or enable automatic look-up if you're using DHCP or don't have a router. Under the advanced tab, disable "Register This Connection's Address in DNS". Under the WINS tab, disable LMHOSTS lookup. If you don't intend to use Windows filesharing or remote printing, it should also be safe to click Disable NetBIOS over TCP/IP.
Going back to the control panel, select the Firewall option and disable all exceptions. Alternatively, disable the Windows Firewall and install a third-party firewall such as Zone Alarm - the choice is yours. Zone Alarm has a free version, performs well in my experience, is a proper two-way firewall and keeps track of the programs installed on your machine and grants access on a program-by-program basis (or at least, version 9.2.102.000 does, which is the version I recommend - see the note on firewalls later in the article for more details).
Comodo Firewall is also free. It offers a more difficult to use, but considerably more powerful alternative to Zone Alarm. Comodo allows for very fine-grained firewall control and various other useful features.
Remember to disable the Windows Firewall / Internet Connection Sharing service if you decide not to use the built-in Windows firewall.
Having set up a firewall, install any other security software (e.g. virus killers and anti-malware/spyware) you have. If at all possible, install firewall and security software before connecting to the internet. Reboot. Install any chipset and graphics card drivers you may have. Reboot whenever prompted.
Securing Windows - User Accounts and Securing the Hidden Guest and Administrator Accounts
Open a DOS shell (start menu... run... type "cmd"net user guest passwordReplacing 'password' with a long and difficult to remember password. Don't even bother remembering it, you won't need it unless you're using Windows file sharing (and even then, you could always reset the password with the same command). This command adds a password to the 'guest' user account (which is switched off by default, but this only means it won't let you log in as Guest on the PC - it's still active as the default user account for other people to remotely log on to any shared folders on your PC. Providing you've disabled the file sharing via the network and services as detailed earlier, then this shouldn't ever be an issue, but every layer of security helps).
Now go back to user accounts, and set a password for the 'superuser' account you created during the install process. Ensure files are private. Now create a new account in your own name. Make it a limited user account, and set a password for it. Use this account for everything, and only use the admin account when you absolutely must, for example while installing new programs or changing system settings.