A Guide to Security and Privacy for Windows XP Home Edition
This article may also be useful for other versions of Windows, it's difficult to say - Windows XP is the only version of Windows that I run. Why? Because it's a good, solid version that still has a few years left in it (support for Windows XP ends April 2014) and it has quite modest demands in terms of how modern and fast a computer it requires. The less your computer is being overrun by Windows' demands, the more of its resources are available to the actual programs you want to run. That's why, if you look at the minimum hardware requirements for computer games, software developers tend to specify more memory and processor power for Vista and Windows 7 than they do for Windows XP. In many ways, it pays to stay with the oldest version of Windows that Microsoft still supports that also meets your requirements.
Follow this advice at your own risk, and remember that with today's delightfully complex operating systems, there is no such thing as a completely hack-proof, internet-connected computer. No, not even a Linux or Apple Mac PC. I've tried to make this article as understandable as possible, though you will need some familiarity with various IT concepts. In an attempt to offset this, I'll try to provide helpful links to explain things where I can. Be sure to read and understand the entire article before attempting to follow the steps.
The Quick Version / Checklist / Table of Contents
Get a clean copy of Windows
Download all relevant security patches and service packs
Install Windows - Formatting, partitioning and other considerations
Install Windows - Initial network settings
Install Windows - Setting usernames
Install all Security Updates
Disable unnecessary services
Disable remote assistance and switch on DEP
Disable Autorun
Finish network settings and install firewall
Set up and Secure the user accounts
Disable hidden file extensions
Secure BIOS
Remove unwanted software / List of default Windows processes running on a minimal system
Connect to the internet and run Windows Update
Secure Web Browser
Configure Email
General security and privacy hints and tips
Advanced Security Issues
The Problem of asking an operating system to check itself and the bigger picture
List of useful free software
This article assumes you're installing Windows from scratch (there's not much point in trying to secure a copy of Windows that's been left wide open for months or years). It's designed to provide a high level of security to an internet-connected home computer using free tools. It's suitable for most basic home uses, setups and networks.
A new install of Windows is not secure. Far from it. It's widely reported that a fresh install of Windows XP will be infected with a virus within minutes of connecting it to the internet. I've never actually confirmed this for myself, but from watching my own firewall logs I have noticed frequent suspicious traffic (port scans and attempts to connect to ports associated with known security weaknesses) that suggest that this is probably true.
Securing Windows - First Step: Getting a clean Installation CD
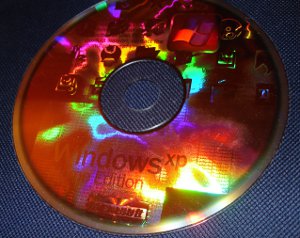
To do this, you'll need a Windows installation CD. Many computer manufacturers refuse to supply a proper install CD with their PCs, and instead offer 'restore' CDs. That's not great, but from a security point of view it's still workable. Some manufacturers don't even bother with the expense of a CD, and instead install the equivalent of a restore CD on a partition on the hard drive. This is far from great, as any malicious software (malware) could theoretically spread to the restore partition.
If your computer uses a restore partition, then note that such setups often provide a facility to create a restore CD/DVD from the partition. If you do this as soon as you get the PC, and before you connect to the internet, then you can be pretty sure that your CD/DVD is a clean copy. Otherwise, create that CD/DVD as soon as possible!
There are many (illegal) copies of Windows CD/DVDs available for free via filesharing, e.g. bittorrent. Use at your own risk. I have no doubt that there are people out there who just want to give out free copies of Windows and mean no harm (except perhaps to Microsoft). I'm equally sure that there are people out there who would like to give out free copies of Windows with keyloggers and viruses hidden in them so that they can build botnets and make money from them. Be careful out there. This list of MD5 and SHA1 hashes should help identify CDs and DVDs that have been tampered with, assuming it's correct.
Securing Windows - Installing

Before installing, you should download all security updates and if your version of Windows doesn't come with the latest Service Pack (for Windows XP that's service pack 3), then you should also download all service packs and burn them to CD. Ideally this should be done from a machine you're reasonably sure is secure. If in doubt, it might be worth re-installing Windows, securing it as much as possible without updates, then using the machine only to download the patches you need and burning them to CD, before finally reinstalling Windows again with the patches you downloaded. How do you know which security fixes to download? The easiest way I know of is install a new copy of Windows, download and install all service packs, and then repeatedly run Windows Update and copy-paste the list of updates from the web page into a text file. Mark the places where you have to restart your computer so you know which updates can all be applied in one go without rebooting. Repeat until there are no more updates, and then manually download all the patches you've made a list of. It's a laborious process but it can be done in an afternoon. Security patches for Windows can be downloaded for later installation (rather than immediately installed) from the Microsoft Download Centre (use the search bar at the top to search for the KB number of the patch you want, e.g. KB2387149. There are usually a number of different downloads for the same KB number, so make sure you get the one that relates to your system - language, service pack number, version of Windows, whether it's 32-bit or 64-bit. XP Home Edition is always 32-bit, even if you have a 64-bit processor). Make sure you have the latest service packs installed before embarking on the security patch download trek, otherwise it may take a lot longer than it needs to.
Installing Windows XP Home
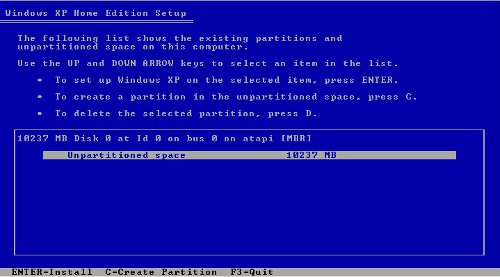
Install Windows with the machine physically disconnected from the internet. If you are connecting via a router, then the network cable should be pulled from the back of the PC to prevent the Windows installer from automatically using DHCP to configure the network (unless you wish to use automatic configuration, in which case keep the PC connected to the router but disconnect the router from the modem). See the Network Settings During Install section for more info.If you're installing to an old hard drive, then it might be a good idea to do a full format, rather than a quick format. Use the NTFS filesystem, not FAT32 (NTFS has additional security features).
Network Settings During Install
During install, Windows may ask you to set up the network. Ideally, you should configure the network manually, rather than automatically via DHCP.This guide is based on setting up a internet connection via a cable modem connected via an Ethernet cable. Other types of internet connection (e.g. dial-up modem or cable modem via USB cable will require a different approach, not covered here). Where cable internet companies provide a modem that can use USB or Ethernet, Ethernet should be your preferred option.
Manual Network Settings
You will need to know various network settings provided by your Internet Service Provider (ISP). You should be able to find the various IP addresses you need on the internet or from your ISP's website or helpline. My ISP is Virgin Media, so without looking it up (I've typed it in so many times) I can tell you that Virgin's DNS servers are located at 194.168.4.100 and 194.168.8.100 (If your ISP isn't Virgin, and you're stuck for a DNS server address, you could always try 8.8.8.8 as a temporary solution, which is Google's DNS servers (perhaps inadvisable from a privacy point of view but a usefully easy-to-remember address if you're ever stuck).Another, ISP-independent set of Domain Name Servers can be found at 8.26.56.26 and 8.20.247.20. These servers belong to Comodo, the security/firewall people and include some extra security features (they will prevent your browser from reaching websites that Comodo have flagged as suspicious). More info here.
If you're connected via a router, you should instruct the router to obtain its settings automatically (via DHCP). Routers will usually be found at address 192.168.1.1, and this is the IP address you should use as a gateway address. When setting your own computer's address, anything from 192.168.1.2 to 192.168.1.254 should be fine (assuming the router is at 192.168.1.1 with a netmask of 255.255.255.0), and the computer's netmask should be 255.255.255.0. The instructions that came with your router should help you out here. If you don't want to mess about with IP addresses, you should leave the DHCP client enabled on your PC and the DHCP server enabled on the router and allow the computer to configure itself automatically instead (however, once you've done this, you could then read all the IP addresses that have been automatically set (using the DOS ipconfig and nslookup commands) and then set them manually). DHCP is probably only a minor security risk, but the fewer the better is the general idea here.
The procedure for setting up the network during install goes like this:
If connecting via a router, ensure the router is set up beforehand using another PC or a previous Windows install. If this is not possible, then refer to the Automatic Network Settings section.
Disconnect the PC from the router or modem by pulling the network cable from the PC.
Install Windows.
When Windows asks for network settings:
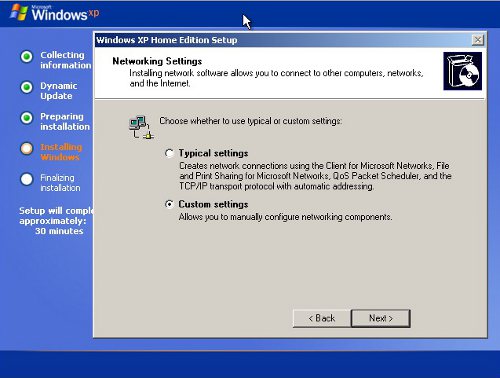
Later, Windows will try and fail to connect to the internet, and then drop to this screen:
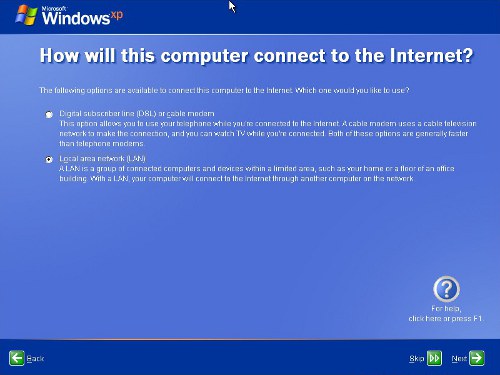
At the next screen:

Automatic Network Settings
With a router
If necessary, configure the router beforehand using another PC or previous Windows install. Ensure the router's DHCP server is enabled. If this is not possible, note that routers will usually be configured to work properly 'out of the box' with default settings, though they may not be as secure as possible (tighten up the security later once Windows is installed).Once you know the router is working, disconnect it from the internet by pulling the network cable out of the cable modem. Leave the router powered up and the PC connected to the router.
Install Windows.
When Windows asks for network settings:
At this screen:
The network should now be configured automatically and be ready for use later when the network is connected.
Without a router
The procedure for automatically configuring the network when connecting direct to a cable modem is the same as with a router, except:The PC should be disconnected from the cable modem by pulling the network cable from the PC.
If in doubt, follow instructions from your ISP and/or use a setup CD they provide - note that this will configure your network and you could then read off all the settings afterwards and then uninstall the ISP software and configure manually).